Even though the Steam desktop client offers many features to gamers, it still has a few problems. Recently, many Steam users have reported Steam Client WebHelper high CPU usage in Windows 11. So, if you are also dealing with problems due to Steam Client WebHelper high CPU usage, you might find this article very useful. This article will share a step-by-step guide on fixing Steam Client WebHelper high CPU usage on Windows 11.
What is Steam Client WebHelper?
Steam Client WebHelper is the Steam Client’s internal browser that launches multiple processes in the background. Due to the Steam Client WebhHelper, you are able to view the Steam Store, Game Library, and the Community tab. When you launch the Steam Client for the first time after a restart, the Steam Client WebHelper is likely to spike up your CPU usage since it loads the Steam Store, Game Library, Community tab, and a few other things. Usually, the CPU usage goes down when all Steam components fully load. But, if the Steam Client WebHelper fails to set up the display needed for the Steam Store game library, it will run in the background and constantly attempt to set up the display. This is what spikes the CPU Usage. If you use Windows 11, your PC is more prone to the Steam Client WebHelper high CPU usage problem. However, the good thing is that you can resolve the problem quickly; and that’s too without installing any third-party app.
2 Best Ways to Fix Steam Client WebHelper High CPU Usage
Hence, if you are dealing with Steam Client WebHelper High CPU usage in Windows 11, you need to follow some simple methods we have shared. Here’s how to fix Steam Client WebHelper High CPU usage in Windows 11.
1) Disable the Animated Avatars
The Steam Client for Windows has a feature called Animated Avatars & Animated Frames. The Steam Client WebHelper controls the Animated Avatars feature, and when it fails to load the Animated avatars, it triggers the high CPU usage on Windows 11. So, you could try disabling the Animated Avatars & Animated Avatar Frames to fix the problem.
First, open the Steam desktop client on your PC.
Next, click on the Friends tab on the top menu and select View Friends List.
On the Friends List, click on the Settings gear icon.
On the next screen, turn off the ‘Enable Animated Avatars & Animated Avatar Frames in your Friends List and Chat’ option.
That’s it! You are done. After making the changes, restart your Steam desktop client.
2) Disable Steam Overlay
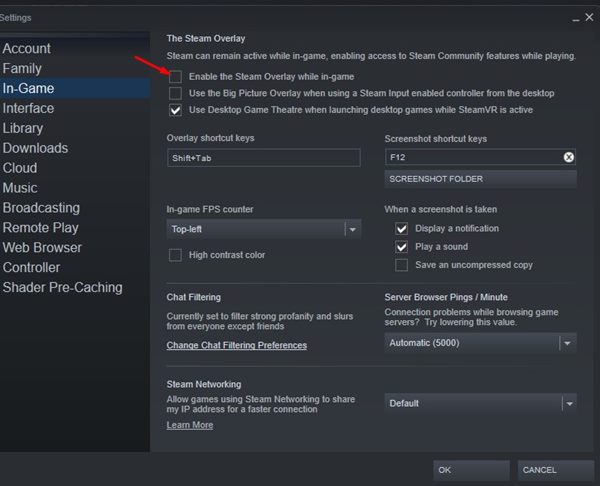
If you are still facing Steam Client WebHelper High CPU Usage issue, you need to disable the Steam Overlay feature. Steam Overlay is also a part of Steam’s user interface, which the WebHelper tries to load. If the Steam Client WebHelper fails to load the Steam Overlay, it triggers High CPU usage. Here’s how to disable the Steam Overlay.
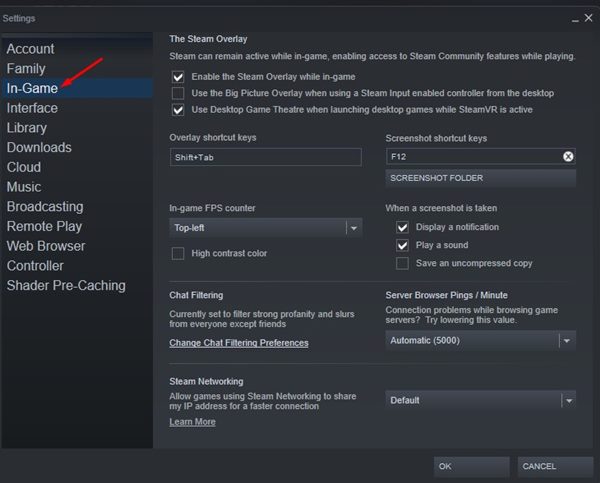
First of all, open the Steam client on your PC. Next, click on Steam > Settings.
On the Settings Window, click on the In-Game option on the right pane.
On the left pane, uncheck the ‘Enable the Steam Overlay while in-game’ option. Once done, click on the Ok button
That’s it! You are done. After making the above changes, restart your Steam client.
3) Disable Other Visual Elements of Steam Client
Apart from the Steam Overlay, you can also try disabling a few other options in the Interface settings. Here are the few options you need to disable to fix Steam Client WebHelper high CPU usage on Windows 11.
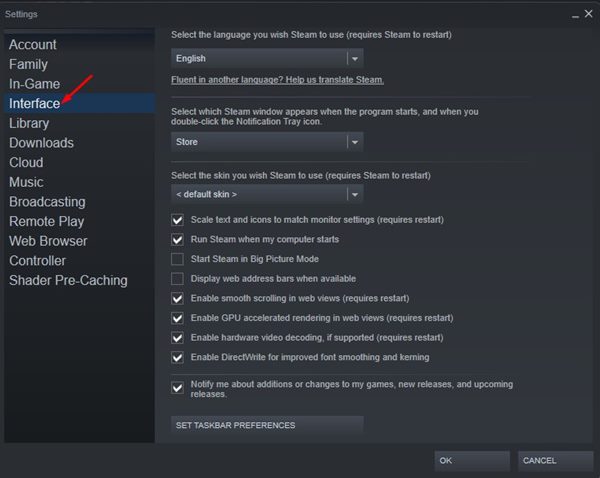
First of all, open the Steam Desktop client and select Steam > Settings.
On the Settings Window, switch to the Interface tab.
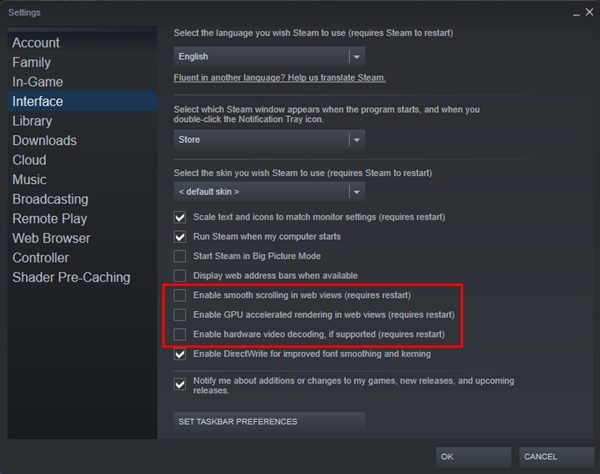
On the right pane, disable these three options:
Enable smooth scrolling in web views The Enable GPU accelerated rendering in web views Enable Hardware video decoding
- You need to uncheck these three options to disable the features. Once done, click on the Ok button. That’s it! You are done. This will probably fix Steam Client WebHelper High CPU usage on Windows PC.
4) Run Steam Without WebHelper
Since it was the Steam WebHelper raising the CPU usage on your Windows computer, you can disable the WebHelper altogether. If you disable this, lots of important visual elements of Steam might not load, but it will boost the in-game FPS. Here’s how to run Steam Without WebHelper
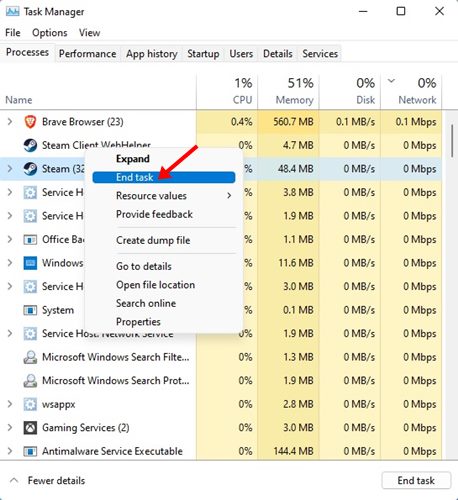
Close the Steam client and End Task all its related processes from the Task Manager.
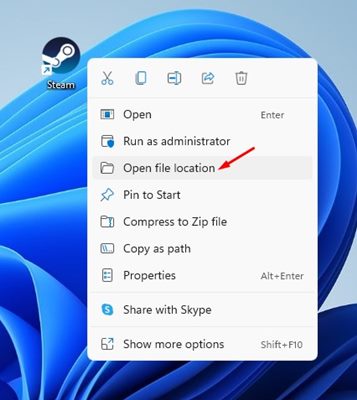
Now, right-click on the Steam desktop shortcut and select Open File Location.
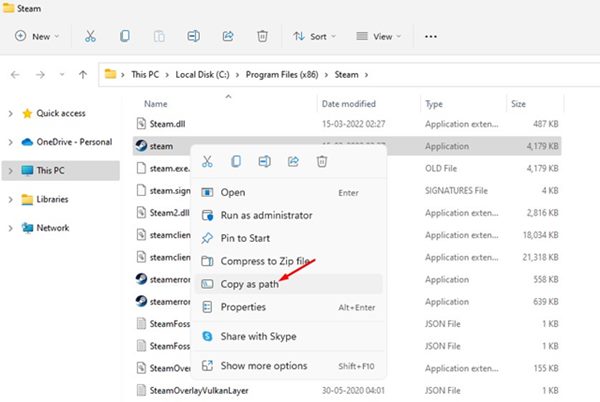
On the Steam folder, locate the steam.exe file. Right-click on the steam.exe and select Copy as path option.
Now press the Windows key + R button on your keyboard. On the Run dialog box, paste the file path you have copied in the above step and append the line -no-browser +open steam://open/minigameslist
The whole command will be something like: “C:\Program Files (x86)\Steam\steam.exe” -no-browser +open steam://open/minigameslist
Once done, click on the Ok button on the Run dialog box. That’s it! This will launch the Steam Desktop client on your PC without the WebHelper.
5) Reinstall Steam Client
If all of the methods fail to fix the problem for you, you need to reinstall the Steam Client. Maybe Steam Client WebHelper is using more CPU resources due to incorrect settings or corrupted steam files. Hence, it’s good to reinstall the Steam desktop client if everything else fails. This will possibly fix Steam Client WebHelper high CPU usage on Windows 11. So, these are the few best methods to fix Steam Client WebHelper high CPU usage on Windows. Although we have used Windows 11 to demonstrate the methods, you can implement the same methods to fix the problem on Windows 10.
![]()
![]()
![]()
![]()

